Overview
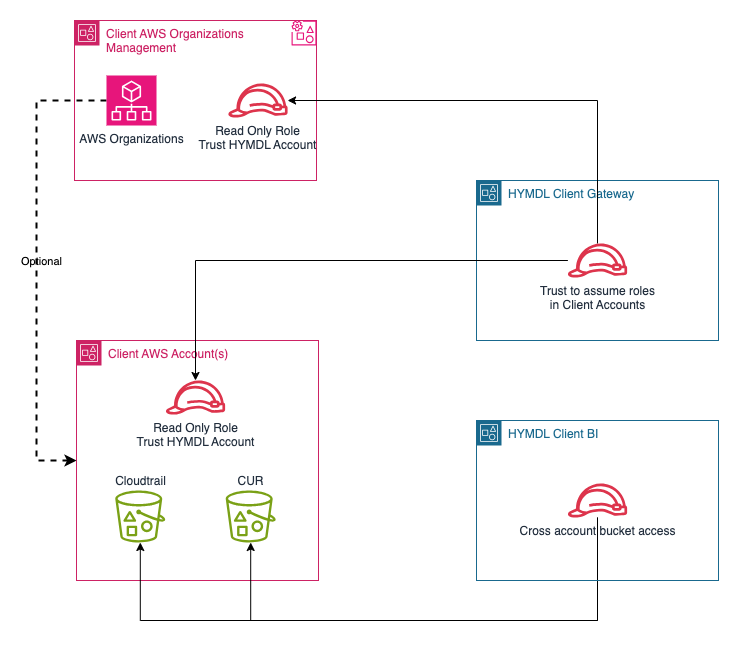
HYMDL establishes connections to clients' AWS accounts using cross-account IAM roles. The level of access required varies depending on the modules and capabilities the client intends to utilize.
Quick Start Guide
This guide helps you quickly set up the necessary infrastructure to integrate your AWS environment with HYMDL. Follow these steps to establish secure cross-account access:
-
Download our automation package: Get our IAM Role Setup Automation Package containing ready-to-use CloudFormation templates and Terraform scripts.
-
Deploy the IAM roles using your preferred method:
- For AWS Organizations environments:
- CloudFormation StackSets (recommended for centralized deployment)
- Terraform multi-account (for infrastructure-as-code workflows)
- For individual AWS accounts:
- For AWS Organizations environments:
-
Configure bucket policies and KMS for:
- Cost and Usage Report bucket (for billing data access)
- CloudTrail logs bucket (for security monitoring)
-
Set up event notifications in your CloudTrail bucket to enable real-time security monitoring.
-
Complete the integration by providing to HYMDL through your client portal:
- Organization role ARN (if using AWS Organizations)
- Task role ARN
- CUR bucket name and prefix
- CloudTrail bucket name
- SNS topic ARN
The automated setup creates roles with appropriate permissions and configures CloudTrail monitoring for real-time security insights.
Need more details? See the complete setup instructions
Module Requirements
Security, Compliance, and FinOps Modules: For the Security, Compliance, and FinOps modules, HYMDL typically requires read-only privileges to the client's AWS accounts. This allows HYMDL to gather necessary information and perform analysis without making any changes to the client's resources.
Security Module Proactive Capability: If the client wishes to leverage the proactive capability of the HYMDL Security module, write privileges will be necessary. This enables HYMDL to take active steps in securing the client's AWS environment based on predefined rules and policies.
Governance and Account Vending Machine (AVM) Module: The HYMDL Governance and Account Vending Machine (AVM) module is responsible for creating new accounts for the client and managing the lifecycle of key resources. This module operates within the client's own AWS account, and HYMDL triggers its functionality through a secure API. The AVM module streamlines the process of provisioning new accounts while maintaining the client's control over their AWS environment.
Connecting to AWS Organizations or Individual Accounts: HYMDL can connect to a client's existing AWS Organizations structure or directly to individual AWS accounts, depending on the client's setup.
-
AWS Organizations: If the client is already utilizing AWS Organizations, HYMDL requires read-only access to the AWS Organizations service. This allows HYMDL to retrieve details about the client's Organizational Units (OUs), accounts, and policies. With this information, HYMDL can provide insights and recommendations aligned with the client's organizational structure.
-
Individual AWS Accounts: In cases where the client is not using AWS Organizations, HYMDL can connect directly to individual AWS accounts. Clients have the ability to add their individual accounts to the HYMDL client profile after logging in. This flexibility ensures that HYMDL can accommodate clients with various AWS account configurations.
By leveraging cross-account IAM roles and adapting to the client's AWS account setup, HYMDL ensures secure and efficient integration with the client's AWS environment. This allows HYMDL to provide comprehensive security, compliance, and cost optimization solutions tailored to the client's specific needs.
Access Management
Below is a summary of the IAM account access best practices HYMDL follows, designed to enhance the security posture of both our service and our client's environments:
AWS Account Access Best Practices
General practice
-
Principle of Least Privilege: We ensure that permissions granted are only those necessary to perform a given task. No personnel or system has more access than needed, minimizing potential security risks.
-
Use of IAM Roles for AWS Resources: We utilize IAM roles for applications running on AWS services to interact with other AWS resources and cross-account roles to access resources in clients accounts. This eliminates the need to manage static credentials and reduces the risk of credential leakage.
Internal practice
-
Multi-Factor Authentication (MFA): We require MFA for all users within our environment, providing an additional layer of security beyond username and password.
-
Role-Based Access Control (RBAC): Access permissions are grouped by role and assigned to users based on their specific job functions. This ensures that users have access only to the resources necessary for their roles.
-
Regular Audits and Reviews: We conduct regular audits of IAM policies and practices, ensuring that all configurations are secure and compliant with the latest security standards. This includes reviewing permission usage and ensuring that outdated or unused permissions are revoked.
-
Compliance with AWS Best Practices: We stay aligned with AWS’s best practices and recommendations, updating our security measures as new features and guidelines are released AWS IAM best practice.
By implementing these IAM best practices, we ensure that our integration with client AWS accounts is secure, reducing the risk of unauthorized access and data breaches. Our commitment to these principles reflects our dedication to maintaining the highest standards of security and compliance in our operations.
Initial Setup
Client Onboarding - IAM Role Setup
As part of the onboarding process, clients are required to set up IAM roles in their AWS accounts to grant HYMDL the necessary permissions to operate effectively. This step is crucial for establishing a secure connection between HYMDL and the client's AWS environment.
Onboarding Options:
Clients have two options for completing the IAM role setup during the onboarding process:
-
Self-service Signup Bot: HYMDL provides a user-friendly Self-service Signup Bot that guides clients through the process. The bot collects needed information for a new client onboarding and proivdes links to sections of this Documentation to help clients with IAM role setup.
-
Pre-sales Support Team Assistance: Alternatively, clients can seek the assistance of our knowledgeable Pre-sales Support team to set up the IAM roles. Our team of experts will work closely with the client to understand their specific requirements and guide them through the process of creating the necessary IAM roles in their AWS accounts.
The Pre-sales Support team will provide detailed instructions and assist the client in configuring the IAM roles with the appropriate permissions. They will ensure that the roles are set up correctly and in compliance with AWS best practices and HYMDL's security standards.
IAM Role Permissions:
The specific permissions assigned to the IAM roles will depend on the HYMDL modules and capabilities the client plans to utilize. As mentioned earlier, the Security, Compliance, and FinOps modules typically require read-only access, while the proactive capability of the Security module may require write permissions.
About the Tenant ID in Trust Policies
Throughout this documentation, you'll see YOUR_TENANT_ID_HERE in the trust policies. This value is a security measure called an External ID that helps prevent the "confused deputy" problem in cross-account scenarios.
- What is it ? A unique identifier specific to your HYMDL account
- Where to get it ? Your tenant ID will be provided by HYMDL during:
- The self-service signup process through our Signup Bot
- Direct communication with our Pre-sales Support team
- Why is it important ? This adds an additional security layer to ensure that only HYMDL's service with your specific tenant ID can assume the roles in your account
Always replace YOUR_TENANT_ID_HERE with your actual tenant ID when configuring IAM roles.
Setting Up IAM Roles and Policies in AWS Management Account
Skip if AWS Organizations is not being used.
Clients using AWS Organizations
To enhance security when fetching account and organizational unit (OU) details, create a dedicated IAM role tailored for this purpose. Define a trust policy for this role, specifying the HYMDL IAM role ARN as the trusted entity. This configuration ensures that only explicitly authorized entities are permitted to assume the role, thereby safeguarding access to sensitive account information.
Trust Policy
{
  "Version": "2012-10-17",
  "Statement": [
    {
      "Effect": "Allow",
      "Principal": {
        "AWS": "arn:aws:iam::891377220922:role/hymdl-bifrost"
      },
      "Action": "sts:AssumeRole",
      "Condition": {
        "StringEquals": {
            "sts:ExternalId": "YOUR_TENANT_ID_HERE"
        }
      }
    }
  ]
}
IAM Role Policy
{
  "Version": "2012-10-17",
  "Statement": [
    {
      "Sid": "OrganizationReadPermission",
      "Action": [
        "organizations:ListAccountsForParent",
        "organizations:ListRoots",
        "organizations:ListAccounts",
        "organizations:ListTagsForResource",
        "organizations:DescribeOrganization",
        "organizations:DescribeOrganizationalUnit",
        "organizations:DescribeAccount",
        "organizations:ListParents",
        "organizations:ListOrganizationalUnitsForParent",
        "organizations:ListChildren",
        "organizations:ListPolicies",
        "organizations:ListTargetsForPolicy",
        "organizations:DescribePolicy"
      ],
      "Effect": "Allow",
      "Resource": ["*"]
    },
    {
      "Sid": "OrganizationWritePermission",
      "Action": [
        "organizations:CreateOrganizationalUnit"
      ],
      "Effect": "Allow",
      "Resource": ["*"]
    },
    {
      "Sid": "CostTagWritePermission",
      "Action": ["ce:UpdateCostAllocationTagsStatus"],
      "Effect": "Allow",
      "Resource": "*"
    },
    {
      "Sid": "DataExportReadPermissions",
      "Action": [
          "bcm-data-exports:ListExports",
          "bcm-data-exports:GetExport"
      ],
      "Effect": "Allow",
      "Resource": ["*"]
    },
    {
      "Sid": "CostReadPermissions",
      "Action": [
          "ce:GetDimensionValues",
          "ce:GetCostAndUsage",
          "ce:GetCostForecast",
          "ce:GetAnomalies"
      ],
      "Effect": "Allow",
      "Resource": [
          "*"
      ]
    },
    {
      "Sid": "TagPolicyWritePermission",
      "Action": [
        "organizations:CreatePolicy",
        "organizations:UpdatePolicy",
        "organizations:DetachPolicy",
        "organizations:AttachPolicy",
        "organizations:DeletePolicy"
      ],
      "Condition": {
        "StringLikeIfExists": {
          "organizations:PolicyType": ["TAG_POLICY"]
        }
      },
      "Effect": "Allow",
      "Resource": ["*"]
    }
  ]
}
Configuring S3 Bucket Policy for Cost and Usage Report Bucket
Before initiating the setup, ensure that the Cost and Usage Report (CUR) is configured for Athena integration. Detailed instructions for setting up the report can be found in the AWS documentation. If it's not already set up, enable data integration with Athena for the report. Additionally, ensure that the CUR report is in Parquet format for compatibility with Athena.
By default, objects stored in S3 are encrypted using server-side encryption with an S3-managed key. However, cross-account access to objects encrypted with this default key is not possible. To facilitate such access, it is advisable to use a KMS (Key Management Service) customer-managed key to encrypt the Cost and Usage Report (CUR) files. You can find detailed guidelines on specifying KMS encryption for S3 objects in the AWS documentation. If your CUR bucket is using the default S3 encryption key, please change it to a customer-managed key.
Next, update the S3 bucket policy where the CUR is stored to allow the HYMDL role read access to the CUR reports. Incorporate the following statement into the existing bucket policy, or if necessary, establish a new policy using this statement. Remember to replace cur-bucketname with the actual name of your bucket:
CUR Bucket policy
{
  "Sid": "CURBucketAccess",
  "Effect": "Allow",
  "Principal": {
      "AWS": [
        "arn:aws:iam::891377220922:role/hymdl-bifrost",
        "arn:aws:iam::851725619218:role/hymdl-analytics"
      ]
  },
  "Action": [
      "s3:ListBucket",
      "s3:GetObject"
  ],
  "Resource": [
      "arn:aws:s3:::{cur-bucketname}",
      "arn:aws:s3:::{cur-bucketname}/*"
  ]
}
Configuring KMS Policy
To enable the HYMDL role to decrypt the encrypted resources in the CUR bucket, you need to update the KMS key policy by adding the following policy statement. Using "*" in the Resource field is appropriate here as this is a resource-based policy, and it will apply only to the resource to which it is attached:
CUR bucket KMS key policy
{
  "Sid": "CURBucketDecryptPermission",
  "Effect": "Allow",
  "Principal": {
      "AWS": [
        "arn:aws:iam::891377220922:role/hymdl-bifrost",
        "arn:aws:iam::851725619218:role/hymdl-analytics"
      ]
  },
  "Action": [
          "kms:GenerateDataKey*",
          "kms:DescribeKey",
          "kms:Decrypt"
      ],
  "Resource": "*"
}
Configuring S3 Bucket Policy for CloudTrail Logs Bucket
HYMDL leverages AWS CloudTrail logs to monitor changes and trigger scans for resource management. It is crucial to ensure that CloudTrail logging is enabled for your accounts to facilitate this functionality. If you are managing multiple accounts under AWS Organizations, it is highly recommended to enable an organization-wide trail, which provides a comprehensive view of all account activity. Alternatively, you can enable CloudTrail individually for each account. For detailed guidance on setting up and managing CloudTrail, please refer to the AWS CloudTrail User Guide.
The first trail is free. If you create a second trail, it can be costly depending on your account activity. Additional details here
To ensure HYMDL can access your CloudTrail logs, update the S3 bucket policy where CloudTrail logs are stored. Incorporate the following statement into the existing bucket policy, or establish a new policy using this statement. Remember to replace cloudtrail-bucketname with the actual name of your bucket:
CloudTrail Bucket policy
{
  "Sid": "CloudTrailBucketAccess",
  "Effect": "Allow",
  "Principal": {
      "AWS": [
        "arn:aws:iam::891377220922:role/hymdl-bifrost",
        "arn:aws:iam::851725619218:role/hymdl-analytics"
      ]
  },
  "Action": [
      "s3:ListBucket",
      "s3:GetObject"
  ],
  "Resource": [
      "arn:aws:s3:::{cloudtrail-bucketname}",
      "arn:aws:s3:::{cloudtrail-bucketname}/*"
  ]
}
Configuring KMS Policy for CloudTrail Logs
By default, objects stored in S3 are encrypted using server-side encryption with an S3-managed key. However, cross-account access to objects encrypted with this default key is not possible. For CloudTrail logs, it's important to use a KMS (Key Management Service) customer-managed key to encrypt the bucket contents.
Update the KMS key policy by adding the following policy statement to enable the HYMDL role to decrypt the encrypted CloudTrail logs:
CloudTrail bucket KMS key policy
{
  "Sid": "CloudTrailBucketDecryptPermission",
  "Effect": "Allow",
  "Principal": {
      "AWS": [
        "arn:aws:iam::891377220922:role/hymdl-bifrost",
        "arn:aws:iam::851725619218:role/hymdl-analytics"
      ]
  },
  "Action": [
          "kms:GenerateDataKey*",
          "kms:DescribeKey",
          "kms:Decrypt"
      ],
  "Resource": "*"
}
You can find detailed guidelines on specifying KMS encryption for S3 objects in the AWS documentation. If your CloudTrail bucket is using the default S3 encryption key, please change it to a customer-managed key.
Setting Up S3 Event Notifications for CloudTrail Logs
For real-time monitoring of changes in your AWS environment, HYMDL can process CloudTrail logs as soon as they are delivered to your S3 bucket. This is achieved by configuring S3 event notifications that trigger an SNS topic whenever new CloudTrail logs are created in your bucket.
Step 1: Create and Configure an SNS Topic
First, create a dedicated SNS topic for CloudTrail log notifications and configure its policy:
- Sign in to the AWS Management Console and open the Amazon SNS console at https://console.aws.amazon.com/sns/
- Ensure you are in the intended AWS Region by checking the region selector in the top right corner
- In the navigation pane, choose Topics
- Choose Create topic
- For Type, select Standard
- For Name, you can enter any name that helps you identify the purpose of this topic, for example
hymdl-cloudtrail-notifications(the exact name is up to you) - Choose Create topic
- Make note of the Topic ARN in the details panel, which you'll need for the following steps
- From the details page of your newly created topic, choose the Access policy tab
- Choose Edit
- Replace the default policy with the following policy (make sure to replace the placeholders):
SNS Topic Policy
{
  "Version": "2012-10-17",
  "Id": "__default_policy_ID",
  "Statement": [
    {
      "Sid": "__default_statement_ID",
      "Effect": "Allow",
      "Principal": {
        "AWS": "*"
      },
      "Action": [
        "SNS:GetTopicAttributes",
        "SNS:SetTopicAttributes",
        "SNS:AddPermission",
        "SNS:RemovePermission",
        "SNS:DeleteTopic",
        "SNS:Subscribe",
        "SNS:ListSubscriptionsByTopic",
        "SNS:Publish"
      ],
      "Resource": "arn:aws:sns:YOUR_REGION:YOUR_ACCOUNT_ID:CREATED_TOPIC_NAME",
      "Condition": {
        "StringEquals": {
          "AWS:SourceOwner": "YOUR_ACCOUNT_ID"
        }
      }
    },
    {
      "Sid": "Allow-HYMDL-Subscribe",
      "Effect": "Allow",
      "Principal": {
        "AWS": [
          "arn:aws:iam::920373002546:root",
          "arn:aws:iam::891377220922:root"
        ]
      },
      "Action": "sns:Subscribe",
      "Resource": "arn:aws:sns:YOUR_REGION:YOUR_ACCOUNT_ID:CREATED_TOPIC_NAME"
    },
    {
      "Sid": "Allow-S3-Publish",
      "Effect": "Allow",
      "Principal": {
        "Service": "s3.amazonaws.com"
      },
      "Action": "sns:Publish",
      "Resource": "arn:aws:sns:YOUR_REGION:YOUR_ACCOUNT_ID:CREATED_TOPIC_NAME",
      "Condition": {
        "ArnLike": {
          "aws:SourceArn": "arn:aws:s3:::YOUR_CLOUDTRAIL_BUCKET_NAME"
        }
      }
    }
  ]
}
Step 2: Configure S3 Event Notifications
Now, set up the S3 bucket to send event notifications to the SNS topic whenever new CloudTrail logs are created:
-
Sign in to the AWS Management Console and open the Amazon S3 console at https://console.aws.amazon.com/s3/
-
In the left navigation pane, choose Buckets, then select your CloudTrail S3 bucket from the list
-
Select the Properties tab
-
Scroll down to the Event notifications section and choose Create event notification
-
In the General configuration section:
- Event name: Enter any name that helps you identify the purpose of this Event, for example
hymdl-cloudtrail-notifications(the exact name is up to you) - Prefix (optional): If you want to filter CloudTrail logs from specific paths, enter something like
AWSLogs/YOUR_ORGANIZATION_ID/ - Suffix (optional): Enter
.gzto filter only compressed CloudTrail log files
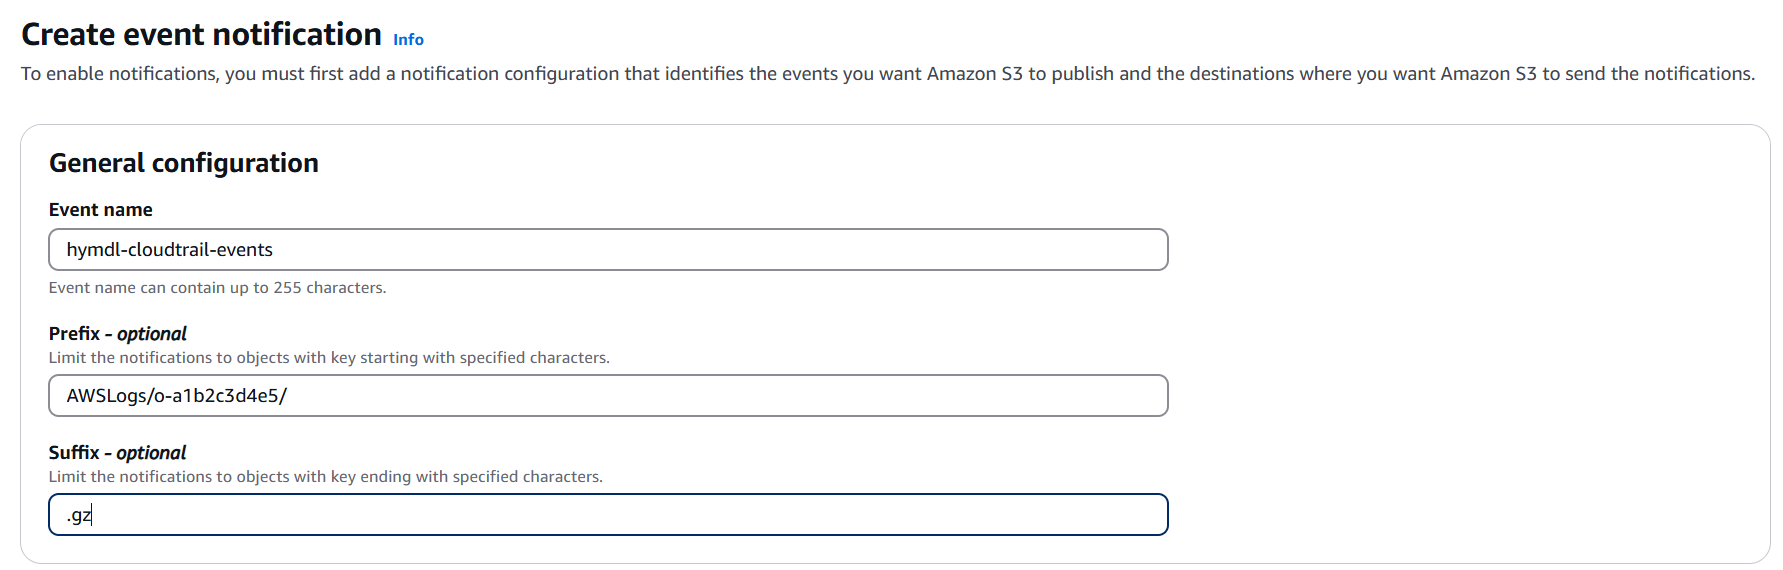
- Event name: Enter any name that helps you identify the purpose of this Event, for example
-
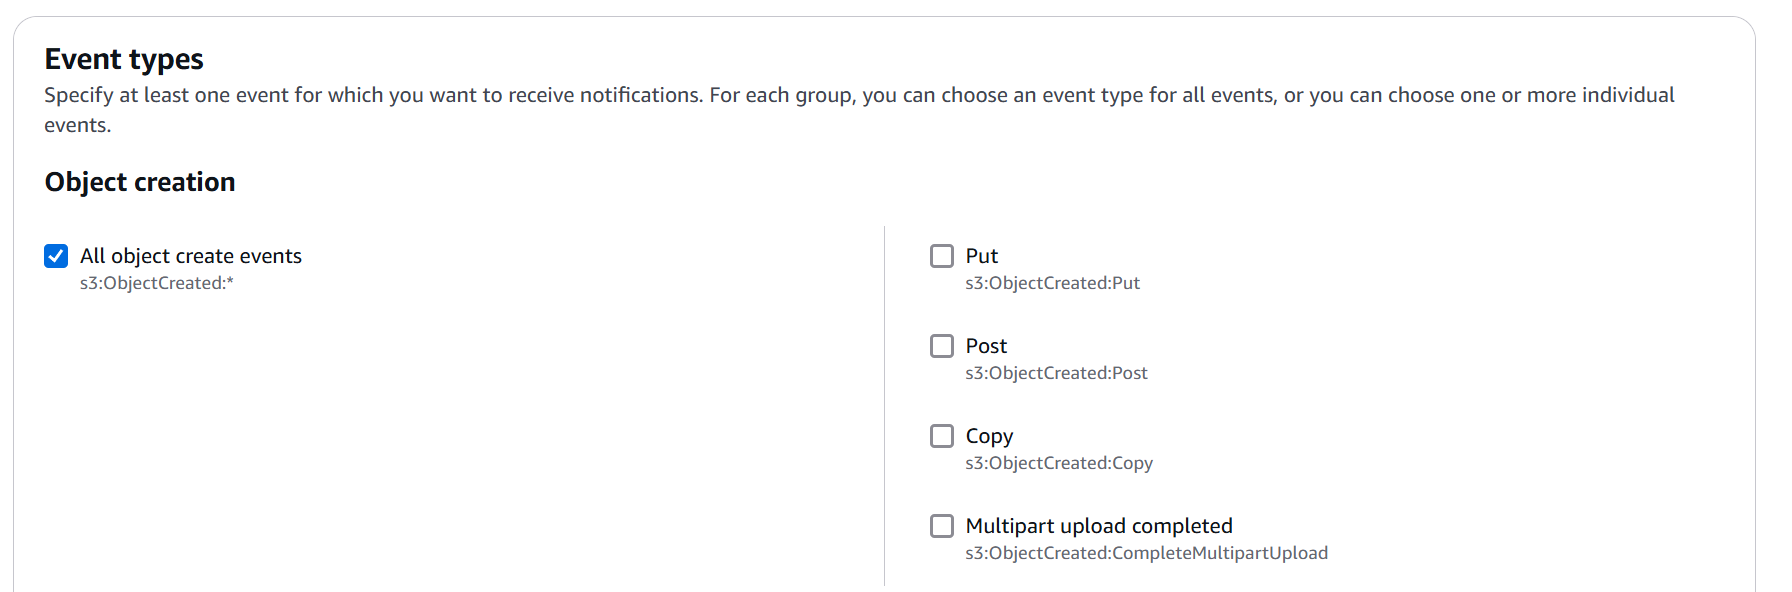
In the Event types section:
- Select All object create events checkbox
-
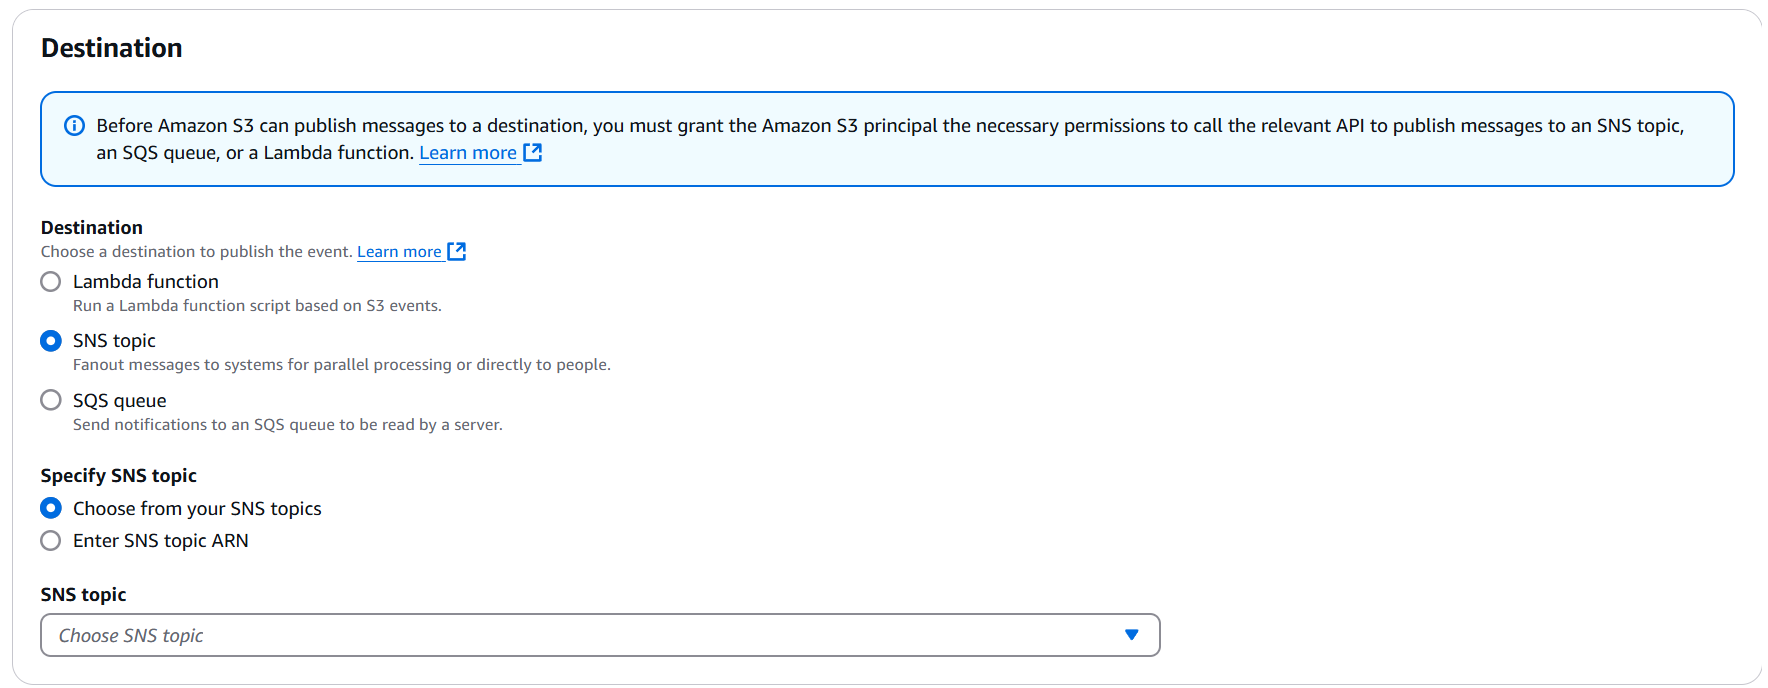
In the Destination section:
- Select SNS Topic as the destination type
- Select Choose from your SNS topics (or Enter SNS topic ARN if it doesn't appear in the list)
- From the dropdown, select the topic you created earlier (or enter its full ARN)
-
Review your settings and click Save changes
-
Verify that your new event notification appears in the Event notifications list
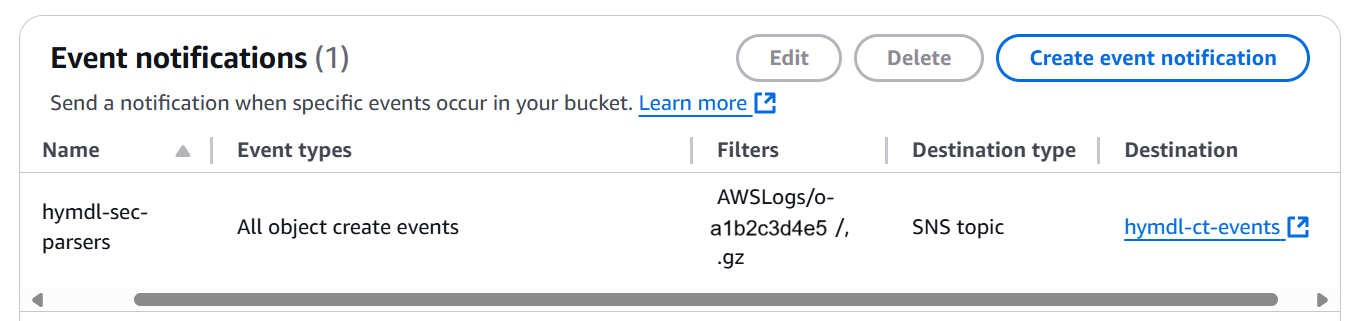
If you're configuring this for organization-wide CloudTrail logs, make sure the prefix points to the path where your CloudTrail logs are stored, which may include your organization ID (e.g., AWSLogs/o-a1b2c3d4e5/).
For AWS Organizations users: If you have an organization-wide CloudTrail, you only need to set up this S3 event notification and SNS topic once in your CloudTrail admin account.
The real-time event notifications significantly improve HYMDL's ability to detect and respond to security events, compliance issues, and important changes in your environment with minimal delay.
IAM Roles for Product modules
To maximize the functionality of our product, it's essential to configure specific IAM roles within your AWS accounts. These roles are designed to facilitate interactions with the HYMDL system and grant access to its various features. Here are the steps to set up each role effectively.
HYMDL Task Role
The HYMDL Task Role is a critical IAM (Identity and Access Management) role that serves as the primary interface for HYMDL's security and governance operations in your AWS environment. This role enables HYMDL to perform essential tasks such as security scanning, compliance checks, cost optimization analysis, and when authorized, remediation actions. By creating this role in each account you wish to monitor, you grant HYMDL the necessary permissions to deliver comprehensive insights and protection for your cloud infrastructure.
HYMDL Task Role
Trust Policy
{
  "Version": "2012-10-17",
  "Statement": [
    {
      "Effect": "Allow",
      "Principal": {
        "AWS": "arn:aws:iam::891377220922:role/hymdl-bifrost"
      },
      "Action": "sts:AssumeRole",
      "Condition": {
        "StringEquals": {
            "sts:ExternalId": "YOUR_TENANT_ID_HERE"
        }
      }
    }
  ]
}
IAM Role Policy
The custom policy includes both read and write permissions by default. If write permissions are not required, you can choose to remove that statement. Our support team will assist you in managing these permissions and periodically notify you to add additional permissions for new AWS services or API actions.
Automate IAM Roles and CloudTrail Monitoring Setup
To ensure smooth setup, we suggest using our CloudFormation templates or Terraform scripts for IAM role configuration and CloudTrail monitoring. Download our IAM Role Setup Automation Package to get started. Our enhanced templates allow you to deploy both the necessary IAM roles and set up real-time CloudTrail event monitoring in a single operation, streamlining your security infrastructure setup.
Requirements
- AWS CLI configured with appropriate credentials
- For CloudFormation: Access to the AWS Console or AWS CLI
- For Terraform with AWS Organizations:
- Python 3.10 or higher
- Terraform v1.9.0 or higher
- Jinja2 Python package (pip install jinja2)
- Boto3 Python package (pip install boto3)
- For Terraform with individual accounts:
- Terraform v1.9.0 or higher
Client with AWS Organization
CloudFormation
Deploy HYMDL Roles with CloudFormation (StackSets for Member Accounts & Management Account Setup)
Configure AWS CLI
aws configure --profile management # Ignore this if root account credentials are already configured
Deploy Task Roles to Multiple Accounts using StackSet
For deploying the HYMDL Task Role to multiple accounts in your AWS Organization:
The ExternalId parameter in the commands below is a security feature that adds an additional layer of trust. You must replace YOUR_TENANT_ID_HERE with the specific tenant ID provided to you during the self-service signup process or by our support team. This ID is unique to your organization and helps ensure secure access.
# Create the StackSet
aws cloudformation create-stack-set \
    --stack-set-name HYMDLTaskRoles \
    --template-body file://aws/cloudformation/HYMDLTaskRole.yaml \
    --capabilities CAPABILITY_NAMED_IAM \
    --permission-model SERVICE_MANAGED \
    --auto-deployment "Enabled=true,RetainStacksOnAccountRemoval=true" \
    --parameters ParameterKey=ExternalId,ParameterValue=YOUR_TENANT_ID_HERE \
    --profile management
Then deploy the stack instances. You have two options:
# Option 1: Deploy to ALL accounts in the organization
aws cloudformation create-stack-instances \
    --stack-set-name HYMDLTaskRoles \
    --regions "us-east-1" \
    --deployment-targets OrganizationalUnitIds="r-xxxx" \
    --operation-preferences "FailureToleranceCount=0,MaxConcurrentCount=1" \
    --profile management

# Option 2: Deploy to a SPECIFIC organizational unit
aws cloudformation create-stack-instances \
    --stack-set-name HYMDLTaskRoles \
    --regions "us-east-1" \
    --deployment-targets OrganizationalUnitIds="ou-xxxx-xxxxxxxx" \
    --operation-preferences "FailureToleranceCount=0,MaxConcurrentCount=1" \
    --profile management
You can also create StackSets through the AWS Console under CloudFormation → StackSets
Deploy Complete Solution to Management Account
StackSets cannot deploy to the management account. Our enhanced HYMDLOrgAccessRole template allows you to deploy both IAM roles and configure CloudTrail monitoring in one step:
aws cloudformation create-stack \
    --stack-name HYMDLManagementRoles \
    --template-body file://aws/cloudformation/HYMDLOrgAccessRole.yaml \
    --capabilities CAPABILITY_NAMED_IAM \
    --parameters ParameterKey=ExternalId,ParameterValue=YOUR_TENANT_ID_HERE \
              ParameterKey=CloudTrailBucketName,ParameterValue=YOUR_CLOUDTRAIL_BUCKET_NAME \
              ParameterKey=CloudTrailLogPrefix,ParameterValue=AWSLogs/YOUR_ORG_ID/ \
    --profile management
After applying this CloudFormation template, please set up the S3 event notifications as described in the Setting Up S3 Event Notifications for CloudTrail Logs section above.
Make sure to deploy this stack in the same region where your CloudTrail S3 bucket is located. Cross-region S3 event notifications can cause unexpected behavior or failures.
This enhanced template provides:
- Organization Access Role for AWS Organizations management
- Task Role for security scanning and remediation
- SNS topic for CloudTrail notifications
- S3 event notification configuration for real-time CloudTrail monitoring
If you only want to set up the IAM roles without CloudTrail notifications configuration, you can omit the CloudTrailBucketName parameter or leave it empty.
Updating Existing StackSets
After initial deployment, you might need to update your StackSets to apply changes to additional accounts, modify parameters, or update permissions:
Adding Stack Instances to Additional OUs:
aws cloudformation update-stack-instances \
    --stack-set-name HYMDLTaskRoles \
    --regions "us-east-1" \
    --deployment-targets OrganizationalUnitIds="ou-xxxx-xxxxxxxx,ou-yyyy-yyyyyyyy" \
    --operation-preferences "FailureToleranceCount=0,MaxConcurrentCount=1" \
    --profile management
Updating StackSet Parameters:
aws cloudformation update-stack-set \
    --stack-set-name HYMDLTaskRoles \
    --template-body file://aws/cloudformation/HYMDLTaskRole.yaml \
    --capabilities CAPABILITY_NAMED_IAM \
    --permission-model SERVICE_MANAGED \
    --parameters ParameterKey=ExternalId,ParameterValue=NEW_TENANT_ID_HERE \
    --operation-preferences "FailureToleranceCount=0,MaxConcurrentCount=1" \
    --profile management
Using AWS Management Console for Updates:
- Navigate to CloudFormation → StackSets in the AWS Console
- Select your "HYMDLTaskRoles" StackSet
Need to find your Organization ID or OU IDs?
You can find these identifiers through:
-
AWS Management Console:
- For Organization ID: AWS Organizations → Settings
- For OU IDs: AWS Organizations → AWS accounts → Select an OU
-
AWS CLI:
# Get your root ID
aws organizations list-roots --query 'Roots[0].Id' --output text

# List OUs under the root or another parent OU
aws organizations list-organizational-units-for-parent --parent-id PARENT_ID
If you're new to AWS Organizations, you can learn more in the AWS Organizations documentation.
When updating a StackSet, the changes will be applied to all existing stack instances deployed from that StackSet. For selective updates, you may need to create a new StackSet.
Terraform
Deploy HYMDL Roles with Terraform (Automated Multi-Account Deployment)
Install Required Python Packages
pip install boto3 jinja2
Generate Terraform Configuration Files
cd aws/terraform/organization
python src/main.py --backend-s3 YOUR_BUCKET_NAME --backend-key hymdl/terraform.tfstate --tenant-id YOUR_TENANT_ID_HERE
Examples:
# Generate for all accounts in your organization:
python src/main.py --backend-s3 my-terraform-state --backend-key hymdl/terraform.tfstate --tenant-id YOUR_TENANT_ID_HERE

# Generate with CloudTrail monitoring setup:
python src/main.py --backend-s3 my-terraform-state --backend-key hymdl/terraform.tfstate \
   --tenant-id YOUR_TENANT_ID_HERE \
   --cloudtrail-bucket your-cloudtrail-bucket \
   --cloudtrail-prefix AWSLogs/YOUR_ORG_ID/

# Generate for specific accounts and region:
python src/main.py --backend-s3 my-terraform-state --backend-key hymdl/terraform.tfstate \
   --tenant-id YOUR_TENANT_ID_HERE \
   --accounts 123456789012 987654321098 --region us-west-2

# Custom output directory:
python src/main.py --backend-s3 my-terraform-state --backend-key hymdl/terraform.tfstate \
   --tenant-id YOUR_TENANT_ID_HERE \
   --output-dir my-terraform-config
Apply the Generated Terraform Configuration
cd output  # or your custom output directory
terraform init
terraform plan  # Review changes
terraform apply
Understanding the Generated Files
The script generates several Terraform files:
- backend.tf - Terraform S3 backend configuration
- providers.tf - AWS provider configuration for all accounts
- role_account_*.tf - One file per account with HYMDL role configurations
- management_resources.tf - Organization role and CloudTrail monitoring resources (management account only)
- If you don't want to set up CloudTrail notifications, simply omit the
--cloudtrail-bucketparameter - Ensure that your AWS credentials have the necessary permissions to access the specified S3 bucket and manage infrastructure resources
- Review the generated terraform files to verify the configuration before applying it with Terraform
Client without AWS Organization
For clients who don't use AWS Organizations, you can deploy the necessary HYMDL roles using either CloudFormation or Terraform. Both methods are explained below.
CloudFormation
Deploy HYMDL Roles with CloudFormation (Individual Account Setup)
Configure AWS CLI
aws configure --profile your_profile_name # Ignore this if credentials are already configured
Deploy Task Role to Individual Account
aws cloudformation create-stack \
    --stack-name HYMDLTaskRole \
    --template-body file://aws/cloudformation/HYMDLTaskRole.yaml \
    --capabilities CAPABILITY_NAMED_IAM \
    --parameters ParameterKey=ExternalId,ParameterValue=YOUR_TENANT_ID_HERE \
    --profile your_profile_name
You can also create the stack through the AWS Console under CloudFormation → Stacks
Terraform
Deploy HYMDL Roles with Terraform (Individual Account Setup)
Configure AWS CLI
aws configure --profile your_profile_name
Navigate to Terraform Directory and Configure
cd aws/terraform/account
Open terraform.tfvars in your editor and update these values:
tenant_id = "YOUR_TENANT_ID_HERE"  # Replace with your HYMDL tenant ID
region    = "us-east-1"            # Replace with your preferred AWS region
Apply the Terraform Configuration
terraform init
terraform plan  # Review changes
terraform apply
Using S3 Backend (Optional)
For production environments, using an S3 backend is recommended. Create a file named backend.tf:
terraform {
  backend "s3" {
    bucket  = "your-terraform-state-bucket"
    key     = "hymdl/terraform.tfstate"
    region  = "us-east-1"  # Replace with your bucket's region
    profile = "your_profile_name"  # Optional, remove if using default credentials
  }
}
- Ensure your AWS credentials have the necessary permissions for managing IAM resources
- The terraform scripts are designed to only create the roles needed for HYMDL integration
Continue onboarding
During the self-service signup process or after your first login to HYMDL, following the receipt of the Welcome email, you can provide the ARNs (Amazon Resource Names) of the newly created roles. Once you submit these ARNs, HYMDL will conduct a validation of the roles to ensure they are correctly configured and have the necessary permissions. After successful validation, HYMDL will begin to gather data, allowing you to fully utilize the features and capabilities of our product.
Support
You can always reach out to our Support Team or through our Contact Us