HYMDL Getting Started Azure
Overview
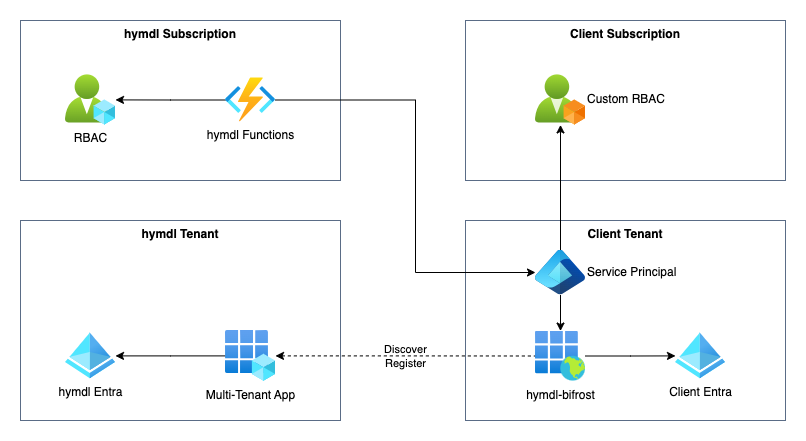
HYMDL uses a multi-tenant application called HYMDL Bifrost to connect to clients' Azure platforms. This setup allows HYMDL to securely and efficiently gather data from multiple Azure tenants, providing a comprehensive view of the cloud environment. This guide will explain the process and best practices for setting up the HYMDL Bifrost application to ensure a secure and smooth integration.
Security, Compliance, and FinOps Modules: For the Security, Compliance, and FinOps modules, HYMDL typically requires read-only privileges to the client's Azure Subscriptions and/or Storage Accounts. This allows HYMDL to gather necessary information and perform analysis without making any changes to the client's resources.
Governance and Landing Zone Module: The HYMDL Governance and Landing Zone module is responsible for creating new subscriptions for the client and managing lifecycle of key resources. This module operates within the client's own Azure subscription, and HYMDL triggers its functionality through a secure API. The Landing Zone module streamlines the process of provisioning new subscriptions while maintaining the client's control over their Azure environment.
Connecting to Azure Subscriptions
Prerequisites
- An active Azure account with administrative privileges.
- Access to the Azure Portal.
Steps to Connect
-
Admin Consent for Hymdl Bifrost:
- Click on Hymdl Consent Link
- Log in with ID which has privileges to provide Tenant wide consent for the Application.
- Carefully review the access requested and provide consent.
- HYMDL Bifrost only needs access to login to your tenant. Rest of the privileges will be managed in the following steps with Azure RBAC.
-
Configure Enterprise Application:
- Navigate to Azure Entra ID > Enterprise applications
- Select the newly created Application for Hymdl Bifrost
- Go to Properties and
- Ensure Enabled for users to sign-in? is set to Yes.
- Ensure Assignment Required is set to Yes.
- Go to Security > Permissions in the newly created Enterprise app.
- Review Permissiona and ensure these permissions are granted admin consent.
-
Create and Assign Custom Role:
HYMDL Bifrost requires a custom role with specific permissions. Create the custom role using PowerShell, Azure CLI, or the Azure Portal:
Required PermissionsTo create custom roles, you need one of the following Azure permissions:
-
Owner role at the Management Group level
-
User Access Administrator role at the Management Group level
-
Custom role with
Microsoft.Authorization/roleDefinitions/writepermission
Ensure you have sufficient privileges before proceeding with role creation.
Download Role Definition File:
📥 Download hymdl-bifrost-permission.json
Custom Role Definition:
{
  "Name": "HYMDL-Bifrost-Reader",
  "Id": null,
  "IsCustom": true,
  "Description": "Custom role for HYMDL Bifrost application with read-only access to Azure resources, cost management data, and key vault secrets for security and compliance analysis",
  "Actions": [
    "*/read",
    "Microsoft.Web/sites/config/list/Action",
    "Microsoft.Authorization/*/read",
    "Microsoft.Billing/*/read",
    "Microsoft.Commerce/*/read",
    "Microsoft.Consumption/*/read",
    "Microsoft.Management/managementGroups/read",
    "Microsoft.Management/managementGroups/subscriptions/read",
    "Microsoft.CostManagement/*/read",
    "Microsoft.Support/*",
    "Microsoft.Resources/deployments/*",
    "Microsoft.Resources/subscriptions/read",
    "Microsoft.Resources/subscriptions/resourceGroups/read",
    "Microsoft.Insights/alertRules/*",
    "Microsoft.KeyVault/checkNameAvailability/read",
    "Microsoft.KeyVault/deletedVaults/read",
    "Microsoft.KeyVault/locations/*/read",
    "Microsoft.KeyVault/vaults/*/read",
    "Microsoft.KeyVault/operations/read"
  ],
  "NotActions": [],
  "DataActions": [
    "Microsoft.KeyVault/vaults/secrets/getSecret/action",
    "Microsoft.KeyVault/vaults/secrets/readMetadata/action",
    "Microsoft.KeyVault/vaults/*/read"
  ],
  "NotDataActions": [],
  "AssignableScopes": [
    "/providers/Microsoft.Management/managementGroups/<your-azure-tenant-id>"
  ]
}
Steps to Create and Assign:
Option 1: Using Azure Portal
- Navigate to your Management Group in the Azure Portal.
- Go to Access control (IAM) > Roles > Add > Add custom role.
- Use the JSON definition above (replace
<your-azure-tenant-id>with your actual Azure tenant ID). - Once created, go to Access control (IAM) > Add role assignment.
- Select the HYMDL Bifrost Reader role and assign it to the HYMDL Bifrost application.
Option 2: Using Azure CLI
First, create the custom role:
# Download the role definition file or create it locally with the JSON above
# Update <your-azure-tenant-id> in the JSON file before running this command

az role definition create --role-definition hymdl-bifrost-permission.json
Then, assign the role:
az role assignment create \
  --assignee 8517a52e-99ad-4b28-a5d1-e9deaad8e643 \
  --role "HYMDL-Bifrost-Reader" \
  --scope "/providers/Microsoft.Management/managementGroups/<your-azure-tenant-id>"
Replace
<your-azure-tenant-id>with your actual Azure tenant ID. -
Setting Up Data Exports for Cost Management
HYMDL Bifrost requires access to Azure Cost Management data to provide comprehensive cost analysis and optimization recommendations.
Steps to Export Cost Data
- Configure Cost Management Data Export:
- Navigate to the Cost Management + Billing section in the Azure Portal.
- Select Cost Management > Exports > Add.
- Define the export settings:
- Template type: Cost and Usage (FOCUS).
- Export Type: Daily export of cost data.
- Storage Account: Specify an existing storage account or create a new one to store the exported data.
- Save the export configuration.
- Choose the improved export template, Cost and Usage (FOCUS). It exports data in the FinOps Open Cost and Usage Specification (FOCUS) format and combines actual and amortized costs, well-suited for FinOps analytics in HYMDL.
- Reference: Create exports — Cost Management improved exports (Microsoft Learn).
- Grant Access to HYMDL Bifrost:
- Go to the storage account where the cost data is exported.
- Navigate to Access control (IAM) > Add role assignment.
- Assign the Storage Blob Data Reader role to the HYMDL Bifrost app to allow it to read the exported cost data.
Subscription Types and Setup Differences
Azure subscriptions come in various types, such as Pay-As-You-Go, Enterprise Agreement, and CSP subscriptions. While the setup process is generally similar, here are some key points to note:
- Enterprise Agreement (EA): Ensure EA-specific settings are configured to allow access to cost data and resources across multiple subscriptions.
- CSP Subscriptions: Work with your Cloud Solution Provider to ensure that HYMDL Bifrost has the necessary permissions.
Kubernetes Integration Setup
For comprehensive security and compliance monitoring, HYMDL offers Kubernetes cluster integration through the HYMDL Kube. This component provides real-time visibility into your AKS clusters and workloads.
Overview
The HYMDL Kube monitors Kubernetes events in real-time and uploads inventory data to Azure Blob Storage using Azure Workload Identity for secure authentication. Deploy this component to all AKS clusters you want HYMDL to monitor.
Before starting, contact HYMDL Support to obtain:
- HYMDL Tenant ID - Required for data organization
- ACR Access Token - Temporary credentials to download Helm charts and container images
- Helm Chart Package - Download HYMDL Kube Helm Chart
Prerequisites
- Azure Kubernetes Service (AKS) cluster(s)
- Helm 3.x installed
- kubectl configured to access your AKS cluster(s)
- Azure CLI installed and authenticated
- OPA Gatekeeper installed on your AKS cluster(s) for policy enforcement
Install OPA Gatekeeper (if not already installed)
HYMDL requires OPA Gatekeeper for Kubernetes policy enforcement and compliance monitoring. Install it on each cluster:
# Install OPA Gatekeeper
kubectl apply -f https://raw.githubusercontent.com/open-policy-agent/gatekeeper/release-3.14/deploy/gatekeeper.yaml

# Verify Gatekeeper installation
kubectl get pods -n gatekeeper-system

# Wait for all Gatekeeper pods to be ready before proceeding
kubectl wait --for=condition=Ready pods --all -n gatekeeper-system --timeout=300s
Setup Checklist
Before proceeding with the Kubernetes integration, ensure you complete the following steps in order:
- Step 1: Setup Azure Infrastructure (Storage Account, Managed Identity, Permissions)
- Step 2: Configure AKS Clusters (Enable Workload Identity, Create Federated Credentials)
- Step 3: Create Docker Registry Secrets (ACR authentication)
- Step 4: Deploy HYMDL Kube (Helm deployment)
- Step 5: Verify Integration (Pod status, authentication, data upload)
- Step 6: Grant HYMDL Bifrost Access (Storage permissions for data access)
Step 1: Setup Azure Infrastructure
Create Shared Storage Account
Create one storage account that will be used by all your Kubernetes clusters:
# Set your variables (choose your own values)
RESOURCE_GROUP="your-resource-group"
STORAGE_ACCOUNT_NAME="your-unique-storage-name"  # Must be globally unique
CONTAINER_NAME="hymdl-kube-data"

# Create storage account (shared across all clusters)
az storage account create \
  --name $STORAGE_ACCOUNT_NAME \
  --resource-group $RESOURCE_GROUP \
  --location eastus \
  --sku Standard_LRS

# Create container for HYMDL data
az storage container create \
  --name $CONTAINER_NAME \
  --account-name $STORAGE_ACCOUNT_NAME \
  --public-access off
Create Managed Identity
# Create user-assigned managed identity
IDENTITY_NAME="hymdl-kube-identity"

az identity create \
  --name $IDENTITY_NAME \
  --resource-group $RESOURCE_GROUP

# Get identity details (save these values)
IDENTITY_CLIENT_ID=$(az identity show --name $IDENTITY_NAME --resource-group $RESOURCE_GROUP --query clientId -o tsv)
IDENTITY_PRINCIPAL_ID=$(az identity show --name $IDENTITY_NAME --resource-group $RESOURCE_GROUP --query principalId -o tsv)
Assign Storage Permissions
# Get storage account resource ID
STORAGE_ID=$(az storage account show --name $STORAGE_ACCOUNT_NAME --resource-group $RESOURCE_GROUP --query id -o tsv)

# Assign Storage Blob Data Contributor role
az role assignment create \
  --assignee $IDENTITY_PRINCIPAL_ID \
  --role "Storage Blob Data Contributor" \
  --scope $STORAGE_ID
Step 2: Configure AKS Clusters
For each AKS cluster where you want to deploy HYMDL:
Enable Workload Identity
CLUSTER_NAME="your-aks-cluster-name"

# Enable workload identity
az aks update \
  --resource-group $RESOURCE_GROUP \
  --name $CLUSTER_NAME \
  --enable-workload-identity \
  --enable-oidc-issuer

# Get OIDC issuer URL
OIDC_ISSUER_URL=$(az aks show --resource-group $RESOURCE_GROUP --name $CLUSTER_NAME --query "oidcIssuerProfile.issuerUrl" -o tsv)
Create Federated Identity Credential
# Create federated identity credential for this cluster
az identity federated-credential create \
  --name "hymdl-kube-federated-${CLUSTER_NAME}" \
  --identity-name $IDENTITY_NAME \
  --resource-group $RESOURCE_GROUP \
  --issuer $OIDC_ISSUER_URL \
  --subject system:serviceaccount:default:hymdl-kube-sa
Step 3: Create Docker Registry Secret
For each cluster, create a secret using the ACR token provided by HYMDL:
# Switch to target cluster context
kubectl config use-context <your-cluster-context>

# Create docker registry secret
kubectl create secret docker-registry hymdl-acr-secret \
  --docker-server=hymdlkube.azurecr.io \
  --docker-username=<provided-by-hymdl-team> \
  --docker-password=<provided-by-hymdl-team> \
  --docker-email=noreply@yourcompany.com
Step 4: Deploy HYMDL Kube
Download and Extract Helm Chart
# Download the Helm chart package from the link provided by HYMDL team
# Extract the chart
unzip hymdl-kube-chart.zip
Configure Values File
The Helm chart package includes a values.yaml template file. Before deployment, you need to update the placeholder values with your specific configuration.
Template file included in the package:
View Complete values.yaml Template
# values.yaml - HYMDL Kube Stack Configuration

# =============================================================================
# SHARED STORAGE VOLUME
# =============================================================================
sharedVolume:
  name: shared-data
  mountPath: /hymdl_shared
  size: 1Gi

# =============================================================================
# AZURE CONFIGURATION
# =============================================================================
azure:
  workloadIdentity:
    enabled: true
    clientId: "<your-identity-client-id>"  # From Step 1
  storage:
    accountName: "<your-storage-account-name>"  # From Step 1
    containerName: "hymdl-kube-data"  # From Step 1
    blobUrl: "https://<your-storage-account-name>.blob.core.windows.net/hymdl-kube-data"

# =============================================================================
# RBAC AND SERVICE ACCOUNT
# =============================================================================
rbac:
  serviceAccount:
    name: hymdl-kube-sa
    annotations:
      azure.workload.identity/client-id: "<your-identity-client-id>"
  clusterRole:
    name: hymdl-kube-cluster-access
    additionalRules: []

# =============================================================================
# HYMDL APPLICATIONS
# =============================================================================
hymdlKube:
  enabled: true
  name: hymdl-kube
  serviceAccountName: hymdl-kube-sa
  replicas: 1
  securityContext:
    runAsNonRoot: true
    runAsUser: 65534
    fsGroup: 65534
  nodeSelector: {}
  tolerations: []
  affinity: {}

# =============================================================================
# EVENTS COLLECTOR
# =============================================================================
hymdlEvents:
  image: otel/opentelemetry-collector-contrib:latest
  mountPath: /hymdl_shared
  resources:
    requests:
      memory: "128Mi"
      cpu: "50m"
    limits:
      memory: "256Mi"
      cpu: "200m"
  healthCheck:
    enabled: true
    port: 13133
    initialDelaySeconds: 10
    periodSeconds: 30
  fileExport:
    filename: "events.json"
    maxMegabytes: 1
    maxBackups: 50

# =============================================================================
# METRICS COLLECTOR
# =============================================================================
hymdlMetrics:
  image: otel/opentelemetry-collector-contrib:latest
  resources:
    requests:
      memory: "128Mi"
      cpu: "50m"
    limits:
      memory: "256Mi"
      cpu: "200m"

# =============================================================================
# KUBE CRAWLER
# =============================================================================
hymdlCrawler:
  image: hymdlkube.azurecr.io/crawler:latest
  mountPath: /hymdl_shared
  cloudProvider: azure
  azureClientId: "<your-identity-client-id>"

  resources:
    requests:
      memory: "256Mi"
      cpu: "100m"
    limits:
      memory: "512Mi"
      cpu: "500m"

  extraEnv:
    - name: appType
      value: "crawler"
    - name: appName
      value: "hymdl-kube"
    - name: AZURE_STORAGE_ACCOUNT_NAME
      value: "<your-storage-account-name>"
    - name: AZURE_BLOB_CONTAINER_NAME
      value: "hymdl-kube-data"
    - name: AZURE_TENANT_ID
      value: "<your-azure-tenant-id>"
    - name: AZURE_FEDERATED_TOKEN_FILE
      value: "/var/run/secrets/azure/tokens/azure-identity-token"
    - name: load_type
      value: "delta"
    - name: WATCH_DIR
      value: "/hymdl_shared"
    - name: STORAGE_BUCKET
      value: "hymdl-kube-data"
    - name: STORAGE_PROVIDER
      value: "azure"
    - name: tenant_id
      value: "<hymdl-tenant-id>"
    - name: logging_level
      value: "INFO"
    - name: CLUSTER_NAME
      value: "<your-cluster-name>"
    - name: OUTPUT_DIR
      value: "/tmp/kube-output"

# =============================================================================
# RISK ASSESSMENT (CRONJOB)
# =============================================================================
hymdlRisk:
  enabled: true
  image: hymdlkube.azurecr.io/risk:latest
  mountPath: /hymdl_shared
  cloudProvider: azure
  azureClientId: "<your-identity-client-id>"

  # CronJob Configuration
  schedule: "0 2 * * *"  # Run daily at 2 AM UTC
  successfulJobsHistoryLimit: 3
  failedJobsHistoryLimit: 1
  restartPolicy: Never

  resources:
    requests:
      memory: "256Mi"
      cpu: "100m"
    limits:
      memory: "512Mi"
      cpu: "500m"


  extraEnv:
    - name: appType
      value: "risk-assessment"
    - name: appName
      value: "hymdl-kube-risk"
    - name: AZURE_STORAGE_ACCOUNT_NAME
      value: "<your-storage-account-name>"
    - name: AZURE_BLOB_CONTAINER_NAME
      value: "hymdl-kube-data"
    - name: AZURE_TENANT_ID
      value: "<your-azure-tenant-id>"
    - name: AZURE_FEDERATED_TOKEN_FILE
      value: "/var/run/secrets/azure/tokens/azure-identity-token"
    - name: load_type
      value: "full"
    - name: WATCH_DIR
      value: "/hymdl_shared"
    - name: STORAGE_BUCKET
      value: "hymdl-kube-data"
    - name: STORAGE_PROVIDER
      value: "azure"
    - name: tenant_id
      value: "<hymdl-tenant-id>"
    - name: logging_level
      value: "INFO"
    - name: CLUSTER_NAME
      value: "<your-cluster-name>"
    - name: OUTPUT_DIR
      value: "/tmp/risk-output"
Before running helm install, update these placeholders in the values.yaml file:
<your-cluster-name>- Unique identifier for this cluster<hymdl-tenant-id>- Provided by HYMDL team<your-identity-client-id>- From your managed identity creation<your-storage-account-name>- Your Azure storage account name<your-azure-tenant-id>- Your Azure tenant ID
The file is pre-configured with sensible defaults for resource limits, schedules, and other settings. You only need to replace the placeholder values marked with < > brackets.
Deploy with Helm
# Deploy HYMDL to the current cluster
helm upgrade --install hymdl-stack ./helm/hymdl-stack \
  --set kubeCrawler.image.repository=hymdlkube.azurecr.io \
  --set kubeCrawler.image.tag=latest \
  --set kubeCrawler.imagePullSecrets[0].name=hymdl-acr-secret \
  --set hymdlRisk.image.repository=hymdlkube.azurecr.io \
  --set hymdlRisk.image.tag=latest \
  -f values-override.yaml \
  --namespace default

# Verify deployment
kubectl get pods -l app=hymdl-kube-crawler
kubectl logs -l app=hymdl-kube-crawler --tail=50
Step 5: Verify Integration
Check Pod Status
# Verify all components are running
kubectl get pods -l app=hymdl-kube-crawler

# Check service account configuration
kubectl describe serviceaccount hymdl-kube-sa
Test Azure Authentication
# Get pod name
POD_NAME=$(kubectl get pods -l app=hymdl-kube-crawler -o jsonpath='{.items[0].metadata.name}')

# Test storage access
kubectl exec $POD_NAME -- az storage blob list \
  --account-name $STORAGE_ACCOUNT_NAME \
  --container-name $CONTAINER_NAME \
  --auth-mode login
Monitor Data Upload
# Check crawler logs for successful data uploads
kubectl logs -l app=hymdl-kube-crawler -f | grep -i "upload"

# Verify data in Azure Storage
az storage blob list \
  --account-name $STORAGE_ACCOUNT_NAME \
  --container-name $CONTAINER_NAME \
  --output table
Step 6: Grant HYMDL Bifrost Access
To allow HYMDL Bifrost to read the Kubernetes data collected by the HYMDL Kube, grant storage access permissions:
# Grant HYMDL Bifrost access to read Kubernetes data
az role assignment create \
  --assignee 8517a52e-99ad-4b28-a5d1-e9deaad8e643 \
  --role "Storage Blob Data Reader" \
  --scope $STORAGE_ID
Alternative: Using Azure Portal
- Navigate to your Kubernetes storage account in the Azure Portal
- Go to Access control (IAM) > Add role assignment
- Select Storage Blob Data Reader role
- Assign to HYMDL Bifrost application (Application ID:
8517a52e-99ad-4b28-a5d1-e9deaad8e643)
This permission allows HYMDL Bifrost to access and analyze the Kubernetes inventory and security data collected by the Kube.
Multi-Cluster Deployment
Important: Deploy HYMDL to all your Kubernetes clusters for comprehensive monitoring:
- Shared Resources: Use the same storage account and managed identity across clusters
- Unique Identification: Each cluster must have a unique name in the values file
- Centralized Data: All cluster data flows to the shared storage account
- Individual Deployment: Deploy the Helm chart separately to each cluster
- Monitor logs regularly for authentication or upload issues
- Keep ACR tokens secure and rotate them as advised by HYMDL team
- Ensure all target clusters have the same Helm chart version deployed
Troubleshooting
Common Issues
Pod Image Pull Errors
# Verify registry secret
kubectl describe secret hymdl-acr-secret

# Check if ACR token is still valid
echo "<acr-token>" | docker login hymdlkube.azurecr.io --username <username> --password-stdin
Authentication Failures
# Check workload identity setup
kubectl describe pod $POD_NAME

# Verify federated credential
az identity federated-credential list \
  --identity-name $IDENTITY_NAME \
  --resource-group $RESOURCE_GROUP
Storage Access Issues
# Verify storage permissions
az role assignment list --assignee $IDENTITY_PRINCIPAL_ID

# Test storage connectivity
kubectl exec $POD_NAME -- curl -I "https://$STORAGE_ACCOUNT_NAME.blob.core.windows.net"
Configuration Complete - Information Required by HYMDL
Once you have completed all the setup steps above, please provide the following information to HYMDL Support to enable data access and monitoring:
Required Information
Azure Tenant Information:
- Azure Tenant ID - Your organization's Azure Active Directory tenant ID
Cost Management Data:
- Cost Export Storage Account Name - The storage account where Azure cost data is exported
- Cost Export Container Name - The container name within the storage account containing cost export data
Kubernetes Data (if using Kubernetes integration):
- Kubernetes Storage Account Name - The storage account created for Kubernetes data collection
- Kubernetes Container Name - The container name (typically
hymdl-kube-data)
How to Find This Information
Azure Tenant ID:
# Get your Azure Tenant ID
az account show --query tenantId -o tsv
Storage Account Information:
# List your storage accounts to find the correct names
az storage account list --query "[].{Name:name, ResourceGroup:resourceGroupName}" --output table

# Get storage account details
az storage account show --name <storage-account-name> --resource-group <resource-group-name>
Keep this information secure and only share it through official HYMDL communication channels. This information allows HYMDL to configure data access to your Azure resources for monitoring and analysis.
Summary
By following these steps, you will enable HYMDL Bifrost to effectively manage and optimize your Azure environment, providing visibility, security, compliance, and cost management. For detailed documentation and support, refer to the official Microsoft Azure documentation and the HYMDL Documentation.
For additional assistance, please reach out to HYMDL Support.